The Ultimate Guide To Working Out At Home
Fact Checked On: 2-5-2018 By: Rob Miller

Intro
Note: Click Here
to skip to the workout.
“I want to look ripped… I just need to hit the gym and eat right for a few months.”
This is what most of us tell ourselves when we think of getting a lean and muscular body; however, more often than not, we end up putting off that thought.
Those who have tried to pursue this goal can tell you that it is not always as easily done as said.
Click Here for a printer friendly version of this page.
What’s more, it seems impossible for those trying to achieve their goals with a busy schedule.
Many working men and women already have too much on their plates to go out and visit a gym.

What about the gym itself?
Many people find that the gym is not always an ideal place.
It costs a considerable amount of money to get a decent membership.
For those who cannot afford it, they may quit their dream of getting in shape.
For those that settle for a cheap and low quality gym, they know how frustrating the lack of quality equipment can be.
The unavailability of proper equipment is a major negative factor. Not to mention the crowds.
With crowded gyms, you rarely get a peaceful, organized workout with all the equipment available.
The atmosphere of your local gym can lack that friendly feel.
Many people never start going to the gym because the fear getting laughed at by other gym members.
The reality is that the typical “bro” behavior can kill motivation, especially if you are a newbie. Does all this sound familiar?
You’re certainly not alone.
Here is the good news: You can still achieve your dream of getting ripped without having to go to a gym.
It is possible to work out and get into great shape at home!
One might ask how and the answer would be this guide!

In this guide, I will provide you with everything you need to get started with working out and getting lean and muscular from the comfort of home.
In the coming sections, you will find in-depth and easy-to-understand exercise descriptions and programs that will help you build your dream physique.
I provide you with detailed descriptions of the most effective exercises.
Even someone who has no previous knowledge of workouts will be able to pick up this guide and get started.
As mentioned above, these exercises are all proven by both scientific studies and veterans’ choice to burn the most calories and build the most muscle.
These workouts will help you lose fat and gain muscle in an amazingly short time.
I have written this guide with considerable care so that anyone can easily comprehend it and get started right away.
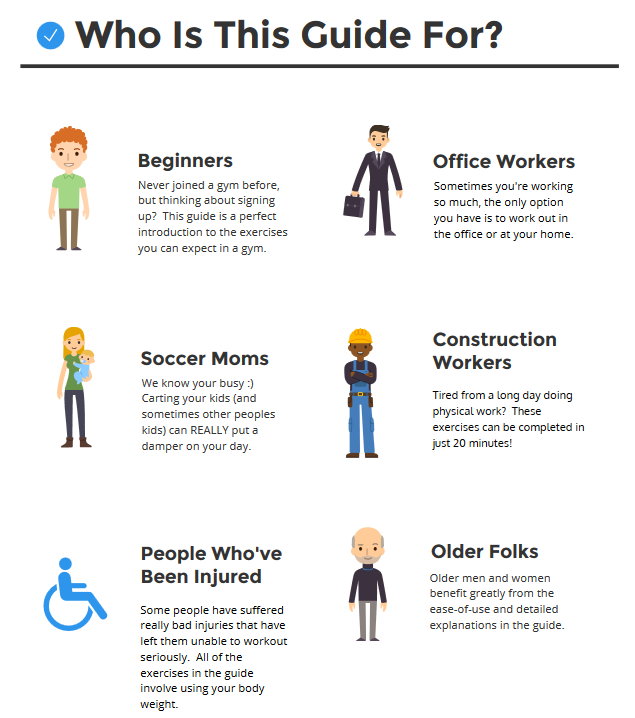
Anyone who is looking to get a lean and muscular body can benefit from this guide.
That includes everyone from the busy office working person to the older people who want to get back in shape but are too hesitant to join a gym.
These exercises can even be done in the office, although I’m not sure how “practical” that may be for some of you 😉
I will help you get the results you want without bothering your busy schedule.
Perhaps most importantly, this guide is for all of the beginners out there who are looking to work out and build a solid foundation of muscle and strength.
If that’s you, this guide is the perfect guiding light.
No more seeking advice about workouts and diets from misinformed friends.
No more getting frustrated in trying to find the right fitness programs for you.
No more searching for hours on the internet without luck.
This guide will end your agitation once and for all.
You will get the right information to get started right away.
Best of all, you are free of the restrictions of a gym.
You can do everything at home and get yourself the ideal body you have been wanting.
This guide is extremely user-friendly to say the least.
No matter who you are or how busy your lifestyle is, as long as you have the will to get ripped, this guide will help you.
You have finally gotten your hands on the first step towards getting your dream physique.
Ready to go?
Good!
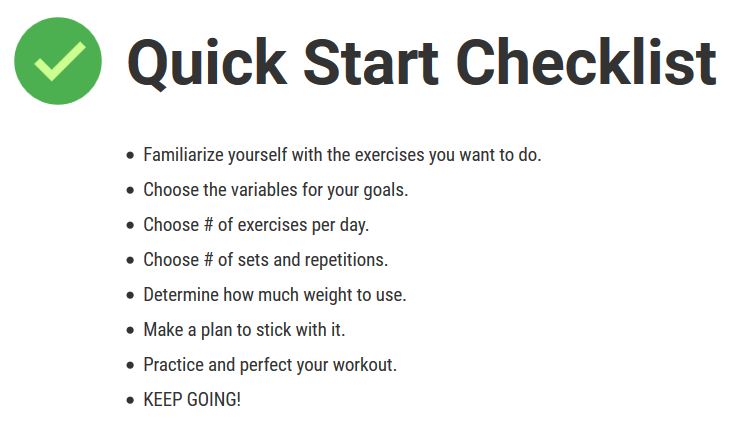
Now the first thing you need to do is completely familiarize yourself with the exercises you want to do (which I provide in full detail).
Give a complete read to the exercises as well as the acute variables in the next chapter. I take care of the planning for you.
Focus on learning the material and getting yourself mentally ready.
After this comes the most important step: practicing and perfecting your workout!
It always takes some time to master form and execution of an exercise.
I have provided all the instructions you’ll need including the recommended sets, repetitions, volume, tempo, and rest breaks.
Once you have the exercises down, you will need to keep at it as the key to having a great body is perseverance and determination.
Your goal will be easy to achieve once you make a routine of following these workouts.
While it is not compulsory, I highly recommend that you follow the suggested time frame of each workout to achieve the best possible results.
As mentioned, this guide is user- friendly, so the time-frames are also very suitable and easy to follow.
Nothing will be achieved without a positive approach towards your hard work.
Sticking to your workouts in the beginning is the hardest part.
Once you pass the initial stages of working out, you’ll set the ball rolling and will start seeing the results.
This is how you will stay in the game and ultimately get the body that you always wanted.
After reading everything above, you are all set to take your first step towards getting in shape.
Are you ready to start chasing after your dream?
Go ahead, give the guide a read and start moving!
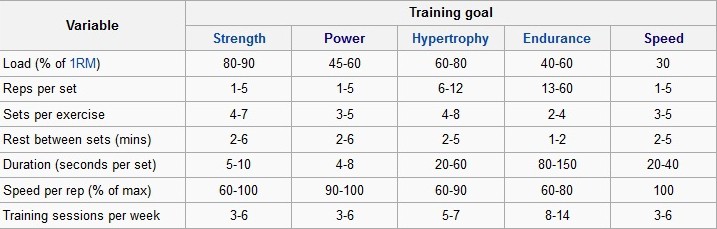
Choosing the Variables for Your Goals
Before you jump into learning the exercises that will help you accomplish your goals of getting ripped, you’ll want to understand how the right variables will play a huge role in your success.
Acute variables are simply the numbers involved with exercises.
Here are a few examples:
- How many sets should you do?
- How many repetitions should each set have?
- How long should you rest for in between sets?
Knowing these numbers BEFORE you begin exercising will kick start your progress, allowing you to see the results you want in less time.
Let’s jump right into it with how many exercises you should perform for each muscle group.
Number of Exercises:
When exercising on a given day, you should be performing 1 to 3 exercises per major muscle group. (1) Here is a list of the major muscle groups:
- Quadriceps
- Hamstrings
- Chest
- Back
- Shoulders
The other muscle groups mentioned in this guide are secondary.
They are smaller and require less attention than the largest muscles on the body.
It’s best to perform one exercise for each smaller muscle group. (1)
- Triceps
- Biceps
- Forearms
- Calves
- Abdominals
- Obliques
Number of Sets:
To activate the highest level of muscle building and fat burning, you’ll want to perform 2 to 4 sets for each exercise that you select. (1)
For example:
- Chest: Bench Press: 3 sets
- Back: Pull-ups: 2 sets
Number of Repetitions:
A study by the American College of Sports Medicine demonstrated that those just starting out with working out respond best when using the 8 to 12 repetition range. (2) For example:
- Chest: Bench Press: 3 sets x 8 to 12 repetitions for each set
- Back: Pull-ups: 2 x 8-12
Seconds of Active Lifting:
Your tempo is extremely important to trigger the right amount of muscular hypertrophy and fat burning.
It is recommended that you perform each repetition with the following tempo pattern:
- Take 4 seconds to lift the weight (concentric phase)
- Take a 1 second pause at the top of the movement (isometric phase)
- Take 2 seconds to lower the weight (eccentric phase) (1) For example:
- Chest: Bench Press: 3 sets x 8 to 12 repetitions for each set
- Pressing the barbell up: Count 4 seconds
- Pause at the top: Count 1 second
- Lowering the barbell down: Count 3 seconds
- Go immediately into the lifting portion of the exercise (4 seconds)
How Much Weight You Should Use:
According to a study published in the Journal of Strength & Conditioning Research, it is recommended that those new to working out should use 60% to 85% of the one-repetition maximum.
Your one-repetition maximum is that absolute highest amount of weight that you can safely lift one time.
Since it can be dangerous for newcomers to determine that amount of weight, it’s always good to start with a lower weight and see how many repetitions you can get.
Bodybuilding.com has a great One-Rep Max calculator you can use to figure all of this out.
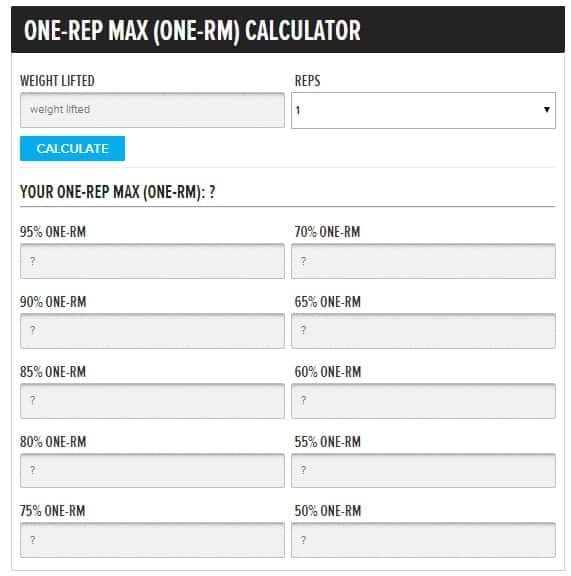
If you’re only able to execute between 8 and 12 repetitions, then you know you’ve reached a perfect weight to begin with for all the rest of the sets. (3) For example:
- Chest: Bench Press: 3 sets x 8 to 12 repetitions for each set
- You can safely press a loaded barbell of 135lbs up safely a maximum of 9 times.
This is the weight you will use for the remaining - Once you can perform more than 12 repetitions, you know it’s time to increase the weight you’re
Exercise selection:
A study published in the American Journal of Physiology showed how compound exercises were ideal for burning the most fat and increasing muscle mass via a greater release of anabolic hormones in the body.
Exercises such as the squat, deadlift, bench press, and overhead press are known to be the best compound exercises in the fitness industry. (4)
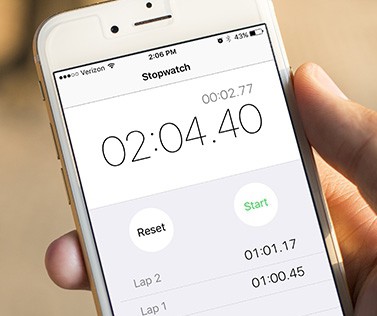
How Long You Should Rest For:
Lastly, if you want to avoid burn out, you need to give yourself a break between sets.
However, you don’t want to rest too long as allowing your muscles to become completely inactive will work against you.
The ideal amount of time to rest in between sets, according to a study in the International Journal of Sports Medicine, is 60 to 90 seconds. (5)
This of course changes depending on what your goal is (i.e. trying to build strength, build power, build endurance, etc.)
I’d recommend picking up a stop watch, or just use the stopwatch on your phone, to ensure you stick to your recommended resting periods.
Exercise List
You found your motivation. You have your numbers in place.
Now it’s time to get familiar with the exercise arsenal that you’ll be utilizing going forward.
These exercises were handpicked because of their success rate as shown in studies and how often veterans will recommend them.
I’d highly recommend reading through each exercise description very carefully and practicing your selected exercises at a slow and steady pace.
Be sure to check out the accompanying media to help you cement everything together.
Jump To A Body Part
ChestBack
Quadriceps
Hamstrings
Shoulders
Triceps
Biceps
Forearms
Calves
Abs
Chest
-
Push-up
- This classic chest exercise starts with getting into the starting position by placing your hands flat on the floor.
Your hands must be directly below your shoulders. - Stretch out your legs behind you.
Your toes and the balls of your feet will be touching the - Brace your core as you push yourself up into the starting
- Before lowering yourself, make sure to keep your back straight by tightening your abdominal
- Bending at the elbows, slowly lower your chest towards the ground.
Do so until your chest is just above the ground.
You will feel a stretch across your chest.
Your arms will be bent at 90 - Pause for a moment before pressing yourself up.
Focus the tension at the chest and slowly straighten your
-
Dive Bombers
- Place your hands flat on the floor.
Make sure they are shoulder width - Keeping your back flat, not arched, fully extend your legs behind you.
You will be in a regular push up - Now, spread your feet slightly wider than your shoulder width.
Shift your arms and legs so that your toes and hands are touching the - Keep your arms extended as you move your hips up towards the sky.
Your butt will be in the air and you will be looking between your feet.
Think of it like this: Your body will look like an upside down “V”.
This is the starting - Bend your elbows. As you do, move forward with your chest.
Your body will arc forward and your hips move towards the - Once your body is parallel with the floor, continue moving forward and arch
- Straighten your arms and push your upper body up towards the sky. Raise your head and chest.
Look above - As you inhale, reverse the movement back to the starting
Here’s a video demonstration:
3. Flat Bench Dumbbell Fly
- Pick up a pair of dumbbells.
Maintain a steady grip as you sit on a flat bench.
Slowly lower yourself while keeping the dumbbells at chest - Brace your core and, with control, push the dumbbells directly above your chest.
Turn the dumbbells so that they face one - Bend your elbow slightly.
Now, open up your chest and feel the contraction as you slowly lower the dumbbells to the sides.
Each dumbbell will follow the arcing motion to the side of your - When the dumbbells are parallel with the ground, pause, and return to the starting position.
Here’s a video demonstration:
Note:This exercise can be performed at home with an inexpensive ($10 at Walmart) exercise ball and a water bottle or similarly weighted object.
And here’s an example of a dumbbell fly without a bench.
Back
-
Superman
- Bring yourself to a lying position on a comfortable surface.
Make sure you are lying face - Extend your arms in front of you.
Your legs will be straight behind - Focusing the contraction in your lower back, squeeze the muscle.
At the same time, lift your chest, arms and legs off the floor.
Again, the primary muscle doing this will be your lower back. Reach as high as you can.
Lift your feet as high as you - Hold this pose for at least two
- Slowly return to the starting position but do not allow your arms and legs to rest on the
- Repeat for the recommended number of
- Bring yourself to a lying position on a comfortable surface.
Here’s a video demonstration:
-
Bent Over Row
- You can perform this exercise with dumbbells or a can of soup.
- Pick up the dumbbells or barbell.
Position the dumbbells or barbell in front of you.
Both will be horizontal to your - Stand with your feet at shoulder width apart.
Slightly bend your - Now, bend forward at your waist.
Push your hips back and keep your knees bent.
Bend over with a flat back until your upper body is parallel with the floor.
This is the starting - Maintaining this position throughout, lift the dumbbells or barbell up towards your midline.
- Your elbows will stay tight and close to your
- Squeeze your back muscles then slowly release the weight straight down to the starting
Here’s a video demonstration:
Quadriceps
-
Body-weight Squat
- Pause then slowly begin to rise and return to the start position.
Once you reach the top, keep the knees bent.
Move directly into your next repetition. - Lower yourself until your thighs reach parallel with the ground.
Your back must be straight and your core should be engaged. - Continue to bend your knees while simultaneously pushing your hips back and towards the ground.
Imagine as if you are sitting down in a chair. - Brace your core, bend your knees slightly, and make sure your back is straight.
This is the starting position. - It’s most popular to put your arms behind your head but you can also cross your arms at your chest.
- Stand straight and place your feet at shoulder width.
Be sure to point your toes slightly
Here’s a video demonstration:
2. Single Leg Squats
Note: If you are a beginner, it is advised to use a chair for support. Stand tall and brace your core.
Bring your feet closer than shoulder
- Slowly, raise your left foot from the floor then extend it in front of you.
The foot should be hovering above the ground. - You may want to extend your hands in front of you for balance.
This is the starting position. - Focusing all of the tension on your right leg, slowly lower your body down.
First, bend your right knee then lower your hips. - Imagine that you are sitting backward into a chair.
- Once your right thigh is parallel, or almost parallel, to the floor, pause then return to the starting position.
Here’s a video demonstration:
Hamstrings
-
Lunges
- Focus tension in your core to ensure you are standing straight.
Position your feet shoulder width apart. - Keep your shoulders back as you maintain a straight back and upright upper body posture.
- Step forward with your right le.g. Simultaneously, drop the left knee towards the ground.
- You will bend your right knee but do not allow it to go past your toes.
Focus the tension in your right le.g. Do not let your left knee touch the ground. - Pause then slowly kick off the ground to return to the starting position.
- Complete all the repetitions for that set and then switch legs.
- You can also alternate between legs for each rep.
- Focus tension in your core to ensure you are standing straight.
Here’s a video demonstration:
-
Bridge
- Lie down on a comfortable surface like an exercise mat.
Bend your knees and keep your feet flat on the floor.
Make sure that your lower back is pressed into the ground. - Position your hands on the ground next to you with the palm down.
You will use your hands for balance. - Brace your core and focus tension in the glutes and hamstrings as you raise your hips off the floor. Slowly, push your pelvis up and forward.
Remember that feet stay flat on the ground. - Once your back, hips and quadriceps are in a straight line stop the movement.
Pause then slowly lower yourself back towards the ground.
Do not let your glutes rest on the ground.
Instead go right into your next rep.
- Lie down on a comfortable surface like an exercise mat.
Here’s a video demonstration:
-
Romanian Deadlifts
- Begin by selecting a pair of dumbbells.
Once you secure your grip, stand tall with a braced core. - Maintaining a flat back and tight core, bend at the knees slightly while you simultaneously push your hips back.
- Keep your arms straight and the dumbbells close to the body.
- Make sure your upper body remains flat as you bend over.
You will feel tension in the back of your legs.
This is how you know you’re activating the hamstrings. - Once your upper body is parallel to the ground, pause and slowly return to the starting position.
- Begin by selecting a pair of dumbbells.
Here’s a video demonstration:
Shoulders
-
Lateral Raise
- Note: You do not need weights to perform this exercise.
Holding soup cans or water bottles can be more than enough weight. - Grab a soup can, water bottle, or small dumbbell in each hand. Stand straight with a flat back.
Make sure that your feet are shoulder width apart. - Extend your arms by your side. Your palms will face your body. Put a slight bend in the elbows.
This is the starting position. - Maintaining a braced core, lift the dumbbells upward and out to your sides.
Do this slowly and maintain a slight bend in the elbows. - Once your arms are parallel with the floor, pause, and slowly release to the starting position.
Here’s a video demonstration:
-
Seated Bent Over Raise
- This exercise is similar to the lateral raise.
The difference is that you will be sitting down and targeting the back of your shoulders. - Sit yourself on a bench, holding a soup can, water bottle, or small dumbbell in each hand.
Extend your arms down at your sides. - Bend at the hips while bracing your core and keeping a flat back.
Maintain this position throughout the exercise. - Slightly bend your elbows and begin the movement by bring your arms up and back in an arcing motion.
- Once your arms are parallel with the floor, pause and slowly return to the starting position.
- This exercise is similar to the lateral raise.
Here’s a video demonstration:
-
Overhead Press
- Select a pair of dumbbells and secure a firm overhand grip.
Stand with your feet in a shoulder-width stance. - Tighten your core and straighten your back.
Slightly bend at the knees. - Bring the dumbbells up in a curling motion and stop once they reach shoulder height.
- With your palms facing forward and your arms at a 90 degree angle, slowly begin to push the dumbbells above your head.
- Focus the tension in your shoulders as you push up.
Extend the arms but do not lock out your elbows. - Pause and slowly lower the dumbbells to shoulder level before beginning again.
Here’s a video demonstration:
- Select a pair of dumbbells and secure a firm overhand grip.
Triceps
-
Chair/Bench Dip
- Place two chairs or flat benches opposite of one another.
The distance between them should be enough that you can comfortably hold yourself up on one chair or bench and extend your legs across to the other. - Step in between the chairs or benches.
Sit on one chair/bench and face the other.
Place your hands on the chair/bench with an overhand grip.
Make sure your hands are tight at your sides. - Extend your legs in front of you and on to the second chair/bench.
The heels of your feet will be supporting your weight.
This is the starting position. - With a straight back, slowly lower yourself down between the chairs/benches.
Bend your elbows and lower your hips. - Once your elbows form a 90 degree angle, pause then return to the starting position.
- Do not lock out your elbows.
Keep a slight bend at all times.
- Place two chairs or flat benches opposite of one another.
Here’s a video demonstration:
-
Tricep / Diamond Push-ups
- Place your hands flat on the floor.
Your hands must be directly below your shoulders. - Stretch out your legs behind you.
Your toes and the balls of your feet will be touching the floor. - Brace your core as you push yourself up into the starting position.
- You are currently in the traditional push-up position.
Before lowering yourself, you will do two things to target the triceps muscles: - First, make sure to keep your back straight by tightening your abdominal muscles.
- Second, bring your hands together below your chest.
- Connect your index fingers and the tips of your thumbs.
The shape in between your hands will resemble a diamond. - Make sure that your elbows and wrists form a straight line from your chest to the floor.
- Now lower yourself towards the ground by bending your elbows and focusing all of the tension in your triceps (upper arms).
- Stop once your chest hovers above the top of your hands.
Return to the starting position but make sure to keep a slight bend in your elbows at all times.
Here’s a video demonstration:
- Place your hands flat on the floor.
-
Overhead Extension
- You can choose to do this standing or by sitting on a bench with a section for back support.
- Select a pair of dumbbells and secure a firm grip in each hand.
- Bracing your core first, curl the dumbbells up towards the shoulders. Now push the dumbbells above your head.
Bring the dumbbells together so that your palms are facing one another. - Keep your upper arms locked in place.
All of the movement will come from moving your forearms. - Lower the dumbbells behind your head.
When your forearms come parallel with the ground, you’ll feel a contraction in your triceps muscles.
Pause here then slowly return to the starting position. - Do not lock out your elbows.
Keep a slight bend and move directly into the next repetition.
Here’s a video demonstration:
Biceps
-
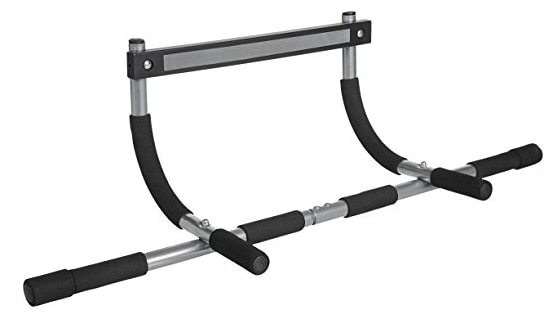
Narrow Grip Chin-up
- Place yourself beneath a pull-up bar. Reach up and grasp it.
Instead of taking an overhand grip as you would with a pull-up, you will take an underhand grip. This is where your palms will face you.
Your hand placement will be closer than shoulder width. - Before pulling yourself up, make sure there is a slight bend in your elbows.
- Brace your core and slowly pull your body up, focusing the tension in your bicep muscles.
- When your chest reaches your forearms, pause and slowly lower your body down.
Again, keep a slight bend in the elbow at all times.
Note: This exercise can be performed with a cheap at home pull up bar, you can find one for as little as $18 on Amazon.![at home pull up bar]()
- Place yourself beneath a pull-up bar. Reach up and grasp it.
-
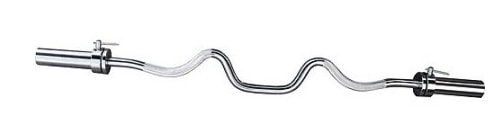
Barbell Curl
- You can use an Olympic barbell or EZ Curl bar for this exercise. You can pick one up cheap at Walmart for about $26.
- Stand up straight and brace your core while holding a barbell.Leave your arms extended in front of you.
Do not lock your elbows. - Take an underhand grip and make sure that your hands are shoulder width apart.
- Keep your elbows tight to your sides and your upper arms in place. Now curl the barbell forward and up.
The contraction will be in your biceps while the forearms will move the weight up and down. - Once the bar is near shoulder level, pause and slowly release towards the starting position.
- Do not lock out your elbows.
Instead, move immediately into the next rep.![at home ez curl bar]()
Forearms
-
Wrist Curl
- You can perform this exercise either by standing, sitting on a chair/bench, or by propping your forearm on a bench with your hand hanging off the opposite end.
- Take hold of a soup can, water bottle, or small dumbbell.
Make sure that you have an underhand grip.
Your hands will be shoulder width apart. - Slowly curl up towards the front of your body using your wrist only.
Leave your arms fully extended with the elbow slightly bent.
It is only the wrist that will be moving. - Once you will feel a contraction in your forearms, slowly lower your hand to the starting position but do not release the tension.
Here’s a video demonstration:
-
Barbell Reverse Curls
- You can perform this exercise by standing up or using a preacher curl bench.
- Secure a firm overhand grip on an Olympic barbell or an EZ Curl bar.
- Fully extend your arms with your feet shoulder width apart.
Brace your core throughout the entire movement.
This is the starting position. - Keep your upper arms in place and your back straight.
Using only your forearms, curl the weight up towards your shoulders. - Once the barbell reaches near shoulder level, pause and slowly lower the barbell to the starting position.
- Do not allow your elbows to lock out.
Instead, move right into the next rep.
Note: This exercise can be performed at home with the EZ curl bar I mentioned above.
Here’s a video demonstration:
Calves
-
Bodyweight Calf Raises
- Stand up straight and brace your core.
- Ideally, you will keep your hands at your sides but feel free to hold on to a wall or chair if you have poor balance.
- Place your feet at shoulder width and point toes forward.
- Focus the tension in your calf muscles as you slowly raise yourself up from the balls of your feet and toes.
- Squeeze at the top of the exercise and slowly lower yourself.
Do not allow your feet to completely touch the ground again.
Instead, go immediately into your next repetition.
Here’s a video demonstration:
-
Calf Jumps
- Stand up straight and brace your core.
- Ideally, you will keep your hands at your sides but feel free to hold on to a wall or chair if you have poor balance.
- Place your feet at shoulder width and point toes forward.
- Put a slight bend in your knees and focus the tension in the calves as you forcefully press off the ground with the balls of both feet.
- Jump into the air and as you come back down, make sure you land softly by keeping a slight bend in the knees.
- Do not dip into a squat on the way back down. This exercise is for your calves.
As soon as you land, check your balance and begin again.
Here’s a video demonstration:
Abdominals
-
Crunch
- Find a comfortable surface such as a carpet or gym mat. Lie down on your back.
Place your feet flat on the ground and bend your knees. - You can choose to place your hands behind your head, crossed on your chest, or at your sides.
- Make sure your lower back is flat on the ground as you engage your core.
- Beginning with the shoulders, allow your abdominals to pull your upper body up and forward.
You are NOT lifting yourself all the way up to your knees (see: Sit- Up). - The focus point is your upper abdominals.
Rise up until you feel a strong contraction then pause and slowly lower back down.
Do not touch the ground with your shoulders.
Instead, move directly into the next rep.
- Find a comfortable surface such as a carpet or gym mat. Lie down on your back.
-
Sit Up
- Find a comfortable surface such as a carpet or gym mat. Lie down on your back.
Place your feet flat on the ground and bend your knees. - You can choose to place your hands behind your head, crossed on your chest, or at your sides.
- Engage your abs and beginning with the shoulders, allow your abdominals to pull your upper body up and forward.
- Bring your upper body to your upper thighs.
Pause and slowly lower yourself back to the starting position.
Do not allow yourself to touch the ground.
Instead, move directly into the next rep.
-
Vacuum
- Find a comfortable surface such as a carpet or gym mat. Lie down on your back.
Place your feet flat on the ground and bend your knees. - Place your hands at your sides.
- Inhale deeply through your nose and count to five seconds.
- Immediately, forcefully exhale through your mouth.
As you do, pull your belly button in and down toward your spine. - Continue forcefully exhaling while you contract your abdominals.
Do this for as long as you possibly can.
- Find a comfortable surface such as a carpet or gym mat. Lie down on your back.
Here’s a video demonstration:
Obliques
-
Side Plank Dip
- Find a comfortable surface to lie on such as an exercise mat or carpet.
Lay on your right side. - Make sure that you have extended your legs straight out.
Have one leg resting on top of the other. - Place your left arm along the top of your body.
- Place your right arm down in front of you on the floor. Rest your weight on your right elbow.
Your right elbow and right shoulder should be aligned.
Push yourself up by straightening your hips with the rest of your body.
You should be elevated by your right elbow.
The rest of your body in a straight line down to your feet. - Brace your core and relax your shoulders. Now slowly lower yourself from the hips.
Drop the hips but do not allow them to touch the ground. - Come back up to the starting position, pause and lower yourself again.
- Find a comfortable surface to lie on such as an exercise mat or carpet.
Here’s a video demonstration:
-
Twists
- Sit on a comfortable surface such as a carpet or an exercise mat.
Extend your legs in front of you and make sure that your upper body is upright with your back straight. - Cross your ankles, raising them off the floor slightly.
You will feel a contraction in your lower abdominals and hips.
Now, bend your knees and bring them up, slightly towards you. - From the core, lean yourself back slightly.
This will counter balance the weight distribution.
Make sure your core is tight and your back is braced.
Make a fist and hold it out in front of you.
This is the starting position. - Slowly, turn yourself to the left, letting your closed fist guide you.
Contract your core and go in the opposite direction.
Try to touch the ground with your closed fist, if you can. - Keep repeating the movement, going from side to side.
- Sit on a comfortable surface such as a carpet or an exercise mat.
Here’s a video demonstration:
-
Weighted Side Bends
- Grab a dumbbell with your left hand. Your palm will face your body.
Stand straight up with your feet at shoulder width apart. - You can place your right hand across your chest or on your waist with the palm facing in.
- Brace your core.
This is the starting position. - Bend over to the left side from your hips.
Bring the weight down to about your knee then pause and go in the opposite direction. - Do not allow yourself to rest.
Go from one side to the other, feeling the contraction in the sides of your core. - When you have finished with the left side, switch hands and perform again on the right side.
- Grab a dumbbell with your left hand. Your palm will face your body.
Here’s a video demonstration:
NOTE: This exercise can be performed AT HOME with a water bottle or similarly weighted object.
Sample Workout Programs
Here are three workout programs that range from beginner to advanced.
These programs are to be followed in order from Workout Program #1 to Workout Program #3. They have been developed in a way that leads to steady progress, allowing you to move to the next stage without trouble.
My recommendation is to use each workout at least twice per week. Follow each program for 4 weeks each.
You will be amazed at the results you achieve in just 3 short months.
Workout Program #1: All Bodyweight Exercises
- Pull-ups: 4 sets of 8 to 12 repetitions
- Push-ups: 3 x 8-12
- Bodyweight Squats: 4 x 8-12
- Lunges: 3 x 8-12
- Dive Bombers: 2 x 8-12
- Chin-ups: 1 x 8-12
- Calf Raises: 1 x 8-12
- Tricep Push-ups: 1 x 8-12
- Sit-ups: 1 x 8-12
Workout Program #2: Hybrid Routine (Bodyweight and Resistance)
- Single Leg Squats: 3 sets of 8 to 12 repetitions
- Bridge: 3 x 8-12
- Flat Bench Dumbbell Fly: 3 x 8-12
- Dumbbell Bent Over Row: 3 x 8-12
- Seated Bent Over Raise: 2 x 8-12
- Chair/Bench Dip: 1 x 8-12
- Wrist Curls: 1 x 8-12
- Calf Jumps: 1 x 8-12
- Side Plank Dip: 1 x 8-12
Workout Program #3: All Resistance Exercises
- Flat Bench Dumbbell Fly: 4 sets of 8 to 12 repetitions
- Leg Press: 4 x 8-12
- Bent Over Row: 4 x 8-12
- Romanian Deadlifts: 4 x 8-12
- Overhead Press: 1 x 8-12
- Overhead Extension: 1 x 8-12
- Barbell Reverse Curls: 1 x 8-12
- Calf Press: 1 x 8-12
- Weighted Crunches: 1 x 8-12
Conclusion
Don’t let all of the media hype fool you.
If you want to get into amazing shape, there are really only a few things that you truly need:
- Expert information (this guide!)
- A small space to move around
- The will to do your best
- (A few soup cans, water bottles, or dumbbells are always a valuable addition!)
If you want to get ripped, you don’t have to face the crowds of people in the gym and you certainly don’t have to sacrifice your work or home life.
All the exercises that are listed above can be safely performed in the comfort of your home.
The full workouts that I’ve provided you take minimal time.
You can expect to complete these workouts in as little as 25 minutes. That’s it!
That’s less than an episode of your favorite show.
Do yourself a favor: Stick to the programs I have detailed above for 4 weeks each.
I’m only asking for 12 weeks of your life in order to help you achieve a new you.
Commit yourself to these workouts and you’ll be amazed at what you see in the mirror at the end of 3 months.
Again, you owe it to yourself to be your best.
Don’t wait for a special occasion; start today.
You won’t regret it.
References
- Clark, M.A., Lucett, S.C., Sutton, B.G. “Muscular System.” NASM Essentials of Personal Fitness Training.
Baltimore, MD: Lippincott Williams & Wilkins. 2012. 290- - Print. American College of Sports Medicine.
American College of Sports Medicine position stand.
Progression models in resistance training for healthy adults.
Med Sci Sports Exerc. 2009 Mar; 41(3):687-708.
- Wilborn CD, Taylor LW, Greenwood M, Kreider RB, Willoughby DS.
Effects of different intensities of resistance exercise on regulators of myogenesis.
J Strength Cond Res. 2009 Nov; 23(8):2179-87.
- Yarasheski KE, Campbell JA, Smith K, Rennie MJ, Holloszy JO, Bier DM.
Effect of growth hormone and resistance exercise on muscle growth in young men. Am J 1992 Mar; 262
- Kraemer WJ, Gordon SE, Fleck SJ, Marchitelli LJ, Mello R, Dziados JE, Friedl K, Harman E, Maresh C, Fry AC.
Endogenous anabolic hormonal and growth factor responses to heavy resistance exercise in males and females.
Int J Sports Med. 1991 Apr;12(2):228-35.
Want To Really Get Ripped? Click Here To Download My FREE
Ask A Question
User Questions and Answers
No Questions Have Been Answered For This Article.
Rob Miller

Rob Miller founded SupplementCritique.com over 7 years ago, and has been the chief editor ever since. He has a diploma in Advanced Dietary Supplements Advisor, and worked at GNC for 3 years. He KNOWS supplements, both inside and out. Rob currently resides in Jupiter, FL, with his wife of 4 years. Learn more about him in his Bio here. Follow him on Twitter , Facebook, LinkedIn, or find him on Google +. View all posts by Rob Miller
